Looking to add a personal touch to your home without spending a fortune? Paper crafts for home decoration are a simple and fun way to do just that.
You don’t need fancy tools or lots of experience—just some paper, a few basic supplies, and a bit of creativity. You’ll discover easy step-by-step projects that will brighten up your space and make it truly yours. Ready to transform your home with handmade charm?
Let’s get started!
Choosing Paper Types
Choosing the right paper type is key for paper crafts in home decoration. The paper affects the look, feel, and durability of your project. Different papers work best for different crafts and styles. Understanding paper types helps you pick the best one for your design.
Cardstock Vs. Construction Paper
Cardstock is thick and sturdy. It holds shapes well and gives a clean finish. Great for decorations that need structure, like boxes or 3D shapes.
Construction paper is softer and lighter. It is easy to fold and cut. Ideal for simple crafts like paper flowers or garlands.
Cardstock lasts longer and resists tearing better than construction paper. Construction paper is more affordable and colorful. Choose based on your craft’s needs.
Recycled And Specialty Papers
Recycled paper is eco-friendly and often textured. It adds a natural look to your decor. Perfect for rustic or vintage themes.
Specialty papers include glitter, foil, and handmade types. They add sparkle and unique effects. Use them for accents or special details.
Both recycled and specialty papers bring character to your crafts. They help make your home decoration unique and personal.

Credit: diy-tutorial.home.blog
Essential Tools And Materials
Creating beautiful paper crafts for home decoration needs the right tools and materials. These essentials make the process smooth and enjoyable. They help you cut, stick, and decorate your projects perfectly.
Gathering the right supplies first saves time and frustration. It also ensures your crafts look neat and last long. Below are the key tools and materials to prepare before starting.
Cutting Tools
Sharp cutting tools are a must for precise shapes and clean edges. A good pair of scissors works for most tasks. Craft knives offer more detail for intricate designs.
A cutting mat protects your work surface and helps with straight cuts. Paper trimmers are useful for straight lines and quick cutting.
Adhesives And Fasteners
Strong adhesives keep your paper pieces firmly attached. Glue sticks are easy to use and good for light paper. Liquid glue offers a stronger bond but needs drying time.
Double-sided tape is clean and quick for flat sticking. Small fasteners like brads or staples add both function and style.
Decorative Elements
Decorative elements bring life and charm to your paper crafts. Colored paper and patterned sheets add visual interest. Stickers and washi tape create fun borders and highlights.
Glitter, ribbons, and buttons add texture and sparkle. Choose decorations that match your home style and color scheme.
Basic Paper Folding Techniques
Basic paper folding techniques form the foundation of all paper crafts. Learning these simple skills helps create beautiful home decorations. Understanding how to fold paper correctly makes your projects neat and strong.
Start with easy folds and practice creasing well. These steps improve your work quality. Folding paper is fun and relaxing. Small, careful moves lead to great results.
Simple Folds
Simple folds include the valley fold and mountain fold. A valley fold bends the paper inward, like a “V” shape. A mountain fold bends the paper outward, like an upside-down “V”.
Other easy folds are the squash fold and reverse fold. Squash folds open a flap and press it flat. Reverse folds tuck paper inside or outside along a crease.
Practice these folds first to build confidence. Most paper craft designs use these basic folds repeatedly.
Creasing Tips
Sharp creases make your paper shapes crisp and clean. Use a fingernail or a bone folder to press folds firmly. Press along the fold line, not just the edges.
Fold on a flat surface for better control. Avoid creasing too hard to prevent paper damage. Smooth and even creases help your craft last longer.
Take your time with each fold. A precise crease improves the overall look of your decoration.

Credit: www.youtube.com
Creating Paper Flowers
Creating paper flowers is a fun and simple way to brighten any room. These flowers add color and charm without needing water or sunlight. You can make them in many shapes and sizes. Use different colors to match your home style.
Follow easy steps to craft beautiful paper flowers. Each step helps you build a flower that looks real. Enjoy the process and see your decoration come alive.
Petal Cutting Patterns
Start by choosing paper in your favorite colors. Draw petal shapes on the paper using a pencil. Try simple shapes like ovals or teardrops. Cut the petals carefully with scissors. You can make petals of different sizes for a natural look. Keep the edges smooth and neat.
Assembling The Flower
Arrange the petals in a circle, overlapping them slightly. Use glue or double-sided tape to stick petals together. Start with larger petals at the bottom. Add smaller petals on top for depth. Press petals gently to secure them. Shape the petals by curling edges with your fingers.
Adding Finishing Touches
Create a flower center using a small paper circle or a bead. Glue it in the middle of the petals. Add leaves or a stem from green paper if you want. Use markers to add lines or dots on petals. This detail makes the flower look lively. Let the flower dry fully before displaying it.
Making Paper Garlands
Making paper garlands is a fun way to brighten any room. They are simple to create and can fit any style or occasion. Paper garlands add color and texture to your home decor without much cost. You only need paper, string, and a few basic tools.
These garlands can hang on walls, windows, or shelves. Their light weight makes them easy to move and change. Crafting garlands lets you express creativity with shapes and colors. This step-by-step guide helps you make beautiful paper garlands easily.
Designing Shapes
Start by choosing shapes that match your theme. Circles, stars, hearts, or leaves work well for many styles. Use a stencil or draw freehand on colored paper. Keep shapes simple for easier cutting and stringing. Cut out several shapes to create a full garland.
Mix different colors or patterns to add interest. Repeat the same shape or alternate for a balanced look. Make sure shapes are not too big or heavy. Thin paper works best to keep the garland light. Experiment with sizes to create depth and variety.
Stringing Methods
Choose a strong but thin string like twine or thread. Punch small holes in the top center of each shape. Thread the string through each hole carefully to avoid tearing. Space shapes evenly along the string for a neat look.
Try knotting the string behind each shape to keep them in place. Alternatively, use glue dots or tape to attach shapes to the string. Leave extra string at both ends for easy hanging. Hang your garland straight or let it drape for a soft effect.
Crafting Wall Art
Crafting wall art with paper adds a personal touch to any room. It brings color and texture without heavy tools or materials. This DIY method suits all skill levels and budgets. Paper crafts allow creativity to shine in unique ways. Follow these simple steps to create beautiful wall decorations.
Layered Paper Designs
Start by choosing paper in different colors and patterns. Cut shapes like flowers, leaves, or geometric forms. Layer these shapes to create depth and interest. Use glue or double-sided tape to hold layers together. Experiment with size and placement for a 3D effect. Layered designs make your wall art stand out and feel lively.
Framing Ideas
Choose simple frames to highlight your paper art. White or black frames create a clean look. Try shadow boxes to protect and add space around the paper. You can also use clip frames for a modern touch. Consider matching the frame color to your room’s theme. Proper framing keeps your art safe and easy to hang.
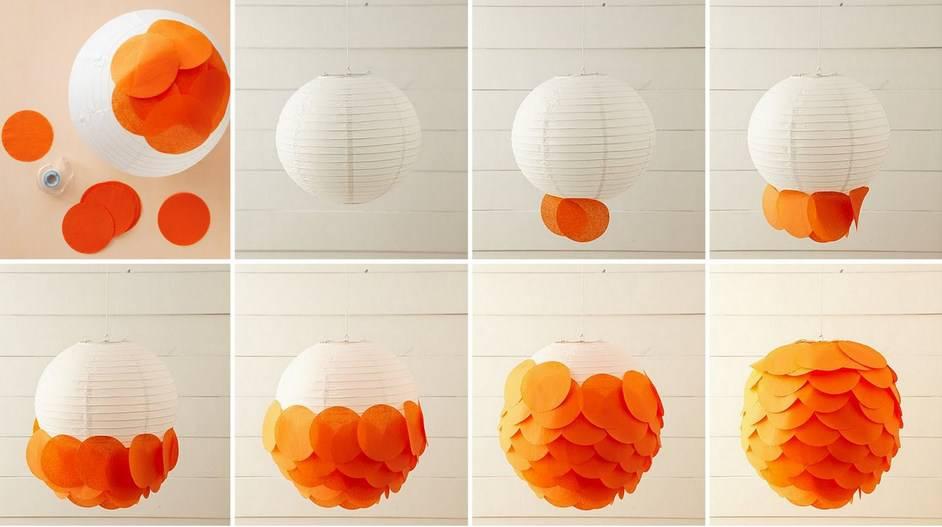
Paper Lanterns And Lampshades
Paper lanterns and lampshades bring a soft, warm light to any room. They are easy to make and add charm to your home. Using simple paper and basic tools, you can create beautiful designs that fit your style.
These crafts brighten spaces with color and texture. They work well for parties or daily decoration. The best part is you can customize shapes and sizes. Let’s explore how to cut, fold, and keep your paper lighting safe.
Cutting And Folding
Start with thin, sturdy paper like origami or craft paper. Use a ruler and pencil to mark your cuts. Straight lines make folding easier and cleaner. Cut slowly and carefully to avoid tears.
Fold the paper along the lines. Use sharp creases to shape your lantern or lampshade. Common shapes include cylinders, spheres, and cubes. Small slits or patterns add a decorative touch.
Glue or tape the edges to hold the shape. Allow any glue to dry fully before using the lantern. Test the shape by gently handling it to make sure it holds well.
Lighting Safety Tips
Always use LED lights with paper lanterns or lampshades. LED bulbs stay cool and reduce fire risk. Avoid candles or incandescent bulbs near paper crafts.
Keep the lantern away from flammable materials and drafts. Place it on stable surfaces to prevent tipping. Check the paper regularly for signs of damage or overheating.
Use battery-operated lights for easy and safe setups. Turn off lights when not in use. Safety keeps your home cozy and worry-free with paper decorations.
Credit: www.k4craft.com
Maintaining Paper Crafts
Paper crafts add a unique charm to home decor. They brighten rooms with color and texture. Keeping them clean and safe helps them last longer. Proper care preserves their beauty and shape. Small efforts make a big difference in durability.
Cleaning Techniques
Dust paper crafts gently using a soft brush. A clean paintbrush works well for tight spots. Avoid water or liquid cleaners that damage paper. Use a dry cloth to wipe flat surfaces carefully. Handle the craft with clean hands to prevent stains.
Storage Solutions
Store paper crafts in a cool, dry place away from sunlight. Sunlight causes colors to fade and paper to weaken. Use clear plastic boxes or acid-free folders for protection. Keep crafts flat to avoid bends or creases. Label storage containers to find crafts easily later.
Frequently Asked Questions
What Basic Materials Are Needed For Paper Crafts At Home?
You need colored paper, scissors, glue, and a ruler. Optional items include markers, stickers, and decorative tape. These materials are affordable and easy to find for any home project.
How Can I Create 3d Paper Crafts For Decoration?
Fold paper into shapes like cubes, flowers, or stars using step-by-step templates. Use glue to secure edges. 3D crafts add depth and interest to your home décor.
What Are Simple Paper Craft Ideas For Beginners?
Start with paper flowers, garlands, or wall art. These projects require minimal tools and provide quick, beautiful results. They are perfect for learning basic folding and cutting techniques.
How Do I Preserve Paper Crafts For Long-lasting Decor?
Keep paper crafts away from moisture and direct sunlight. Use a clear sealant spray for extra protection. Store them in dry, cool places to maintain colors and structure.
Conclusion
Creating paper crafts adds charm to any home space. These easy steps help you make beautiful decorations. Crafting feels fun and lets your creativity grow. You can use simple materials found around your house. Try different shapes and colors to suit your style.
Small changes can brighten your rooms instantly. Enjoy making crafts with family or friends. Your home will look warm and unique. Keep practicing, and your skills will improve quickly. Paper crafts bring joy and a personal touch to decor. Start today and see the difference yourself.